
 Posts
Posts


Hi,
Please note that I have split my old blog argurosblog in two parts.
I have noticed that looking at some computer programming code with the next post being about a pasta or rice dish was not working very well.
This is my blog about computing
Arguros Computing
This is my blog about cooking
Arguros Cooking
I left this blog on the web because google has already indexed it and you might not have found anymore a live link in case you searched by blog using the search engine.
I hope you will enjoy the change
Showing posts with label computing. Show all posts
Showing posts with label computing. Show all posts
Saturday, January 7, 2012

Wednesday, October 5, 2011
How to call a parametric stored procedure from Microsoft Excel Query
Hi,
This is a very nice trick to call a stored procedure with parameters from excel.
If you type for example
exec model.GetPrices (?,?,?,?)
or
CALL model.GetPrices (?,?,?,?)
you will get this message
"Parameters are not allowed in queries that can't be displayed graphically"
while instead if you put the second Call within {} like that
{CALL model.GetPrices (?,?,?,?)}
it will work!!!
This is a very nice trick to call a stored procedure with parameters from excel.
If you type for example
exec model.GetPrices (?,?,?,?)
or
CALL model.GetPrices (?,?,?,?)
you will get this message
"Parameters are not allowed in queries that can't be displayed graphically"
while instead if you put the second Call within {} like that
{CALL model.GetPrices (?,?,?,?)}
it will work!!!
Monday, November 29, 2010
How to get the scripting dictionary enumerator to use in the for each loop in visual basic
A common practice is writing VB 6.0 or VBA code to wrap the Collection object in order to create strongly type Collections.
An alternative to the collection object is the scripting.Dictionary object which you can find adding a reference to the Microsoft Scripting Runtime.
The Dictionary Object is an Hash Table, so it is preferred to the Collection object when you need to access elements in the collection by key.
In addtion it has few properties and methods that the Collection object is lacking.
Keys() returns all the keys as an array
Items() returns all the Items as an array
Exists(key): returns true if a key is in the dictionary.
The major draw back is that it does not have an enumerator so you cannot do something like
for Each v in objDictionary
'Do Something
End
Fortunately there is a work around. You can loop the Items or the Keys array
Dim v as variant
For Each v in objDictionary.Items
'Do Something
End
Not that being Items an array, v must be declared as a variant type.
It would be much nicer if we could loop using a strongly typed objected instead.
You can do this by wrapping the scripting.Dictionary class in a customized class and letting the Items method return a Collection object.
You can find here an example
Parameter Class
Then create a Parameters.cls file and paste the code here.
Parameters Class
Once you have done that you will be able to write code like
An alternative to the collection object is the scripting.Dictionary object which you can find adding a reference to the Microsoft Scripting Runtime.
The Dictionary Object is an Hash Table, so it is preferred to the Collection object when you need to access elements in the collection by key.
In addtion it has few properties and methods that the Collection object is lacking.
Keys() returns all the keys as an array
Items() returns all the Items as an array
Exists(key): returns true if a key is in the dictionary.
The major draw back is that it does not have an enumerator so you cannot do something like
for Each v in objDictionary
'Do Something
End
Fortunately there is a work around. You can loop the Items or the Keys array
Dim v as variant
For Each v in objDictionary.Items
'Do Something
End
Not that being Items an array, v must be declared as a variant type.
It would be much nicer if we could loop using a strongly typed objected instead.
You can do this by wrapping the scripting.Dictionary class in a customized class and letting the Items method return a Collection object.
You can find here an example
Parameter Class
Option Explicit

Private mValue As Variant
Private mName As String
Private mFormat As String


Private Sub Class_Initialize()
  Me.format = ""
  Me.Name = ""
  Me.value = Empty
End Sub

Public Property Get Name() As String
     Name = mName
End Property

Public Property Let Name(strName As String)
    mName = strName
End Property

Public Property Get value() As Variant
  If IsObject(mValue) Then
     Set value = mValue
  Else
     value = mValue
  End If

End Property


Public Property Let value(varValue As Variant)

    If IsObject(varValue) Then
       Set mValue = varValue
    Else
       mValue = varValue
    End If

End Property


Public Property Get format() As String
  format = mFormat
End Property

Public Property Let format(strFormat As String)
   mFormat = strFormat
End Property
Then create a Parameters.cls file and paste the code here.
Parameters Class
Option Explicit

Private Const ErrItemIsMissingNum = vbObjectError + 1001
Private Const ErrItemIsMissingSrc = "FFM:Parameters:Item"
Private Const ErrItemIsMissingDes = "Item is missing form the collection"

Private mKeys As Collection
Private mParsDic As Dictionary

Private Sub Class_Initialize()

  Set mParsDic = New Dictionary


End Sub

Private Sub Class_Terminate()
   Set mParsDic = Nothing
End Sub


Public Function Keys() As Collection
      Dim v As Variant
      Dim h As Collection
      Set h = New Collection
      For Each v In mParsDic.Keys
         Call h.Add(v)
      Next
      Set Keys = h
End Function


Public Function Items() As Collection
      Dim v As Variant
      Dim h As Collection
      Set h = New Collection
      For Each v In mParsDic.Items
         Call h.Add(v)
      Next
      Set Items = h

End Function

Public Function Item(Index As Variant) As Parameter

           Set Item = mParsDic.Item(Index)

End Function

Public Sub Add00(Item As Parameter)
      Call mParsDic.Add(Item.Name, Item)
End Sub

Public Sub Add01(Name As String, value As Variant, Optional format As String = "")
    Dim objParameter As Parameter
    Set objParameter = New Parameter

    objParameter.Name = Name
    objParameter.value = value
    objParameter.format = format
    Call Me.Add00(objParameter)
End Sub


Public Function Count() As Long
     Count = mParsDic.Count
End Function


Public Function Remove(key As String)

     mParsDic.Remove (key)

End Function


Public Function IsInCollection(Name As String) As Boolean


    IsInCollection = mParsDic.Exists(Name)

End Function


Public Function Duplicate() As Parameters
    'This function Create a New Parameter Collection
    Dim objDuplicate As Parameters
    Dim par As Parameter
    Set objDuplicate = New Parameters
    For Each par In Me.Items
        Call objDuplicate.Add01(par.Name, par.value, par.format)
    Next
    Set Duplicate = objDuplicate

End Function
Once you have done that you will be able to write code like
Dim colPars As Parameters
  Dim aa As Parameter, bb As Parameter, cc As Parameter
  Dim h As Variant


  Set colPars = New Parameters
  Set aa = New Parameter
  Set bb = New Parameter
  Set cc = New Parameter

  aa.Name = "Mario"
  bb.Name = "Gennaro"
  Call colPars.Add00(aa)
  Call colPars.Add00(bb)


  For Each cc In colPars.Items
     Debug.Print cc.Name
  Next
Thursday, November 11, 2010
How to read write and save to a config file in C#
Here you can find some c# code to read/write/save to a config file in c#.
Please note that you need to add a reference to
References -> Add Reference -> System.Configuration
and
using System.Configuration.
In Addtion you need to add an application configuration file
Application -> Add -> New Item -> Application Configuration File
Than you need to add an <appSettings> session to it
<?xml version="1.0" encoding="utf-8" ?>
<configuration>
<appSettings>
<add key="cnnString" value="prova"/>
<add key="LastUpdateDate" value="10 Jan 2012"/>
</appSettings>
</configuration>
When you run the application and debug the code you find that it is not working !! You can sse the effect when you run the exe generated in release directory.
--------------------------------------------------------------------------------------------------
Please note that you need to add a reference to
References -> Add Reference -> System.Configuration
and
using System.Configuration.
In Addtion you need to add an application configuration file
Application -> Add -> New Item -> Application Configuration File
Than you need to add an <appSettings> session to it
<?xml version="1.0" encoding="utf-8" ?>
<configuration>
<appSettings>
<add key="cnnString" value="prova"/>
<add key="LastUpdateDate" value="10 Jan 2012"/>
</appSettings>
</configuration>
When you run the application and debug the code you find that it is not working !! You can sse the effect when you run the exe generated in release directory.
--------------------------------------------------------------------------------------------------
using System;
using System.Collections.Generic;
using System.ComponentModel;
using System.Data;
using System.Drawing;
using System.Linq;
using System.Text;
using System.Windows.Forms;
using System.Configuration;

namespace WindowsFormsApplication1
{
    public partial class Form1 : Form
    {
        public Form1()
        {
            InitializeComponent();
        }

        private void button1_Click(object sender, EventArgs e)
        {
            string cnnString;

            // Get the current configuration file.
            Configuration config =ConfigurationManager.OpenExeConfiguration(ConfigurationUserLevel.None);
            cnnString = config.AppSettings.Settings["cnnString"].Value;
            MessageBox.Show(cnnString);
            config.AppSettings.Settings["cnnString"].Value = "Cavolo";
            cnnString = config.AppSettings.Settings["cnnString"].Value;
            config.Save(ConfigurationSaveMode.Modified);
            ConfigurationManager.RefreshSection("appSettings");


        }
    }
}
Wednesday, September 8, 2010
How to create custom collection in VBA tricks
This solution was taken from a forum entry I found on the web
You can, but the process is a bit more manual. If you export a .cls file from one of your VB6 proceedures and view it in a Notepad, you'll notice that some Attributes, not visible while editing your code, are added to the top of the routine(s).
The two properties in question will look something like this:
Property Get Item(Index As Variant) As Parameter
Attribute Item.VB_UserMemId = 0
Set Item = m_Collection.Item(Index)
End Property
Property Get NewEnum() As IUnknown
Attribute NewEnum.VB_UserMemId = -4
Attribute NewEnum.VB_MemberFlags = "40"
Set NewEnum = Me.mCollection.[_NewEnum]
End Property
Now the above all looks "normal" except for the addition of the three "Attribute" Lines.
In the Item Property the line "Attribute Item.VB_UserMemId = 0" makes it the default property.
In the NewEnum, the "Attribute NewEnum.VB_UserMemId = -4" makes it the Default Enumeration Property (I'm sure you recognize the "-4" part.)
The Attribute NewEnum.VB_MemberFlags = "40" is to make the Enumerator a Hidden property, but, technically, this is not recognized in VBA, so it will be visible in IntelliSense, but I don't find that a big deal.
The solution is to (1) Make your Class, (2) SAVE, (3) Export the Class, (4) Remove the Class (steps 3 and 4 can be combined into one, as it asks you if you wish to "Export" when you right-click and choose "Remove") and then (5) Manually add the Attribute Lines as shown above, (6) Re-Import the edited Class.
(Btw, you can add the Attribute NewEnum.VB_MemberFlags = "40" line if you wish -- it won't hurt anything -- but it won't be recognized in VBA, it will just be quietly ignored. So there's no reason to bother doing this, really.)
As you know, editing the code thereafter has some propensity to lose these properties (even in VB6) and so this may have to be repeated occassionally. (A bit of a pain.)
The alternative is to create your class 100% within VB6 and then import it into your VBA Project.
Or, even better, make it in VB6, debugg it, get it running 100%, compile to DLL and then add this DLL to your references. This last concept is probably the most solid, but there could be deployment issues as your DLL now has to be correctly Registered on the Client machine. Not that this is a big problem, but it's not as easy as distributing a VBA Project...
You can, but the process is a bit more manual. If you export a .cls file from one of your VB6 proceedures and view it in a Notepad, you'll notice that some Attributes, not visible while editing your code, are added to the top of the routine(s).
The two properties in question will look something like this:
Property Get Item(Index As Variant) As Parameter
Attribute Item.VB_UserMemId = 0
Set Item = m_Collection.Item(Index)
End Property
Property Get NewEnum() As IUnknown
Attribute NewEnum.VB_UserMemId = -4
Attribute NewEnum.VB_MemberFlags = "40"
Set NewEnum = Me.mCollection.[_NewEnum]
End Property
Now the above all looks "normal" except for the addition of the three "Attribute" Lines.
In the Item Property the line "Attribute Item.VB_UserMemId = 0" makes it the default property.
In the NewEnum, the "Attribute NewEnum.VB_UserMemId = -4" makes it the Default Enumeration Property (I'm sure you recognize the "-4" part.)
The Attribute NewEnum.VB_MemberFlags = "40" is to make the Enumerator a Hidden property, but, technically, this is not recognized in VBA, so it will be visible in IntelliSense, but I don't find that a big deal.
The solution is to (1) Make your Class, (2) SAVE, (3) Export the Class, (4) Remove the Class (steps 3 and 4 can be combined into one, as it asks you if you wish to "Export" when you right-click and choose "Remove") and then (5) Manually add the Attribute Lines as shown above, (6) Re-Import the edited Class.
(Btw, you can add the Attribute NewEnum.VB_MemberFlags = "40" line if you wish -- it won't hurt anything -- but it won't be recognized in VBA, it will just be quietly ignored. So there's no reason to bother doing this, really.)
As you know, editing the code thereafter has some propensity to lose these properties (even in VB6) and so this may have to be repeated occassionally. (A bit of a pain.)
The alternative is to create your class 100% within VB6 and then import it into your VBA Project.
Or, even better, make it in VB6, debugg it, get it running 100%, compile to DLL and then add this DLL to your references. This last concept is probably the most solid, but there could be deployment issues as your DLL now has to be correctly Registered on the Client machine. Not that this is a big problem, but it's not as easy as distributing a VBA Project...
Thursday, September 2, 2010
Mail Merge with multiple To, CC, distribution lists and changing Subject
Link to Advance Mail Merge.doc
Link to Advanced Mail Merge DB.xls
In this two files you will find a way to extend the MS World mail merge to send email to
1) Have multiple mails and distribution list in the To field
2) Have multiple mails and distribution list in the CC field
3) Have a chaning subject
Also nothe the the merged field in the .doc document can be formatted
1) To format a date, toggle the field and add \@"DD MMMM, YYY"
2) To format a number add \##,##
In the attached document you will find an example.
Link to Advanced Mail Merge DB.xls
In this two files you will find a way to extend the MS World mail merge to send email to
1) Have multiple mails and distribution list in the To field
2) Have multiple mails and distribution list in the CC field
3) Have a chaning subject
Also nothe the the merged field in the .doc document can be formatted
1) To format a date, toggle the field and add \@"DD MMMM, YYY"
2) To format a number add \##,##
In the attached document you will find an example.
Sunday, July 4, 2010
Example of VBA code formatting using manoli.net
if you go to this website http://www.manoli.net/csharpformat/ you will be able in a breeze to parse your VBA/C# code in HTML format. You can see at the bottom of this blog post an example.
To make it work in blogspot, you just need to go in Design -> Edit HTML and just after
<b:skin><
If you try to Add a new ODBC data source

only the SQL Server driver will show up.
To sort this problem you need to load up the 32bit version of this Window that can be found at the following path.
C:\Windows\SysWOW64\odbcad32.exe

This way you can create DSN connection other than SQL Server on a 64bit OS.
For futher details just go here
Control Panel -> Administrative tools,-> Data Sources (ODBC)
The ODBC Data Source Administator Window will pop up.
This is actually pointing to this .exe file "C:\Windows\System32\odbcad32.exe"

If you try to Add a new ODBC data source

only the SQL Server driver will show up.
To sort this problem you need to load up the 32bit version of this Window that can be found at the following path.
C:\Windows\SysWOW64\odbcad32.exe

This way you can create DSN connection other than SQL Server on a 64bit OS.
For futher details just go here
Monday, June 7, 2010
The Model View Controller and Presenter Pattern
In this post I will just give you some link I found that describes quite clearly how the Model View Presenter Pattern (MVP) and the Model View Controller pattern work.
As usual I will add my comment when I have a bit of time, in the mean time I hope you will find these link usefull.
This is an excellent introduction to MVP pattern from Nikola Malovic
Model-View-Presenter-_2800_MVP_2900_-pattern.aspx
Here you will get a closer look to the same pattern in the form of MVP supervising controller from the same author
model-view-presenter-mvp-design-pattern-close-look-part-1-passive-view.aspx
And again the MVP passive view explained with a similar example by Nikola to hightlight the differences with the MVP supervising controller
model-view-presenter-mvp-design-pattern-close-look-part-2-passive-view.aspx
For a comparison between MVP and MVC you can have a look here.
model-view-presenter-mvp-vs-model-view-controller-mvc.aspx
Another excellent and quick introduction to the MVP supervising control pattern can be found here
ModelViewPresenterdesignpatterndatabinding.aspx
MVC_intro12122005162329PM/MVC_intro.aspx
As usual I will add my comment when I have a bit of time, in the mean time I hope you will find these link usefull.
This is an excellent introduction to MVP pattern from Nikola Malovic
Model-View-Presenter-_2800_MVP_2900_-pattern.aspx
Here you will get a closer look to the same pattern in the form of MVP supervising controller from the same author
model-view-presenter-mvp-design-pattern-close-look-part-1-passive-view.aspx
And again the MVP passive view explained with a similar example by Nikola to hightlight the differences with the MVP supervising controller
model-view-presenter-mvp-design-pattern-close-look-part-2-passive-view.aspx
For a comparison between MVP and MVC you can have a look here.
model-view-presenter-mvp-vs-model-view-controller-mvc.aspx
Another excellent and quick introduction to the MVP supervising control pattern can be found here
ModelViewPresenterdesignpatterndatabinding.aspx
MVC_intro12122005162329PM/MVC_intro.aspx
Sunday, May 23, 2010
How to Separate the DAL Layer and BLL Layer in a a C# application
Link to Class diagrma Layering
Link to Class Diagram Mail System.
NClass 2.0 or higher is needed to read the file. NClass Website
In this article we are going to discuss how to separate the Data Access Layer (DAL) form the Business Logic Layer (BLL) using
1) The Abstract Factory Pattern
2) The Model Provider Pattern
3) Reflections
On the Class Diagram Mail System you will find many notes on how to separate the BLL from the DAL
I will first comment on the Class diagram you will find on the link. After I will develop an applicaton. This is a working in progress. As usual if you have any suggestion or improvement, just add a comment.
Link to Class Diagram Mail System.
NClass 2.0 or higher is needed to read the file. NClass Website
In this article we are going to discuss how to separate the Data Access Layer (DAL) form the Business Logic Layer (BLL) using
1) The Abstract Factory Pattern
2) The Model Provider Pattern
3) Reflections
On the Class Diagram Mail System you will find many notes on how to separate the BLL from the DAL
I will first comment on the Class diagram you will find on the link. After I will develop an applicaton. This is a working in progress. As usual if you have any suggestion or improvement, just add a comment.
Parsing an XML file using C#
Link to the Code (VS 2008)
I will show you here two pieces of code in C# that will let you parse the Products.XML into a List object.
The first one makes use of the System.XML namespace, while the second use System.XML.Linq one.
The Linq code is pretty amazing, it is so simple I will not even comment it. I managed also to include a "where" clause to filter the output.
An additional note has to be done for the XMLReader methods class for the first example
xmlIn.ReadToDescendant("Product") == true //This code move the cursor to the first "Product"
product.Code = xmlIn["Code"]; //Since we are already on the Product Element we can read its attribute with the indexer
xmlIn.ReadStartElement("Product"); // Checks that we are on Product Element and moves one raw ahead
product.Description = xmlIn.ReadElementContentAsString(); //Read the Content of the Element Description, and moves one raw ahead
product.Price = xmlIn.ReadElementContentAsDouble(); //Read the Content ofthe Element Price, and moves one raw ahead
xmlIn.ReadToNextSibling("Product") // Move the Cursor to the next product and return true if found
//Read The First Root Node
if (xmlIn.ReadToDescendant("Product") == true)
{
do
{
Product product = new Product();
product.Code = xmlIn["Code"];
xmlIn.ReadStartElement("Product");
product.Description = xmlIn.ReadElementContentAsString();
product.Price = xmlIn.ReadElementContentAsDouble();
products.Add(product);
} while (xmlIn.ReadToNextSibling("Product"));
}

"Products.XML"
--------------------------------------------------------------------------------------------------

--------------------------------------------------------------------------------------------------
"Product.cs"
--------------------------------------------------------------------------------------------------
using System;
using System.Collections.Generic;
using System.Linq;
using System.Text;
namespace WindowsFormsApplication1
{
class Product
{
public string Code { get; set; }
public string Description { get; set; }
public double Price { get; set; }
}
}
--------------------------------------------------------------------------------------------------
Form1.cs
--------------------------------------------------------------------------------------------------
using System;
using System.Collections.Generic;
using System.ComponentModel;
using System.Data;
using System.Drawing;
using System.Linq;
using System.Text;
using System.Windows.Forms;
using System.Xml;
using System.Xml.Linq;
namespace WindowsFormsApplication1
{
public partial class Form1 : Form
{
public Form1()
{
InitializeComponent();
}
private void button1_Click(object sender, EventArgs e)
{
//Create the list
List products = new List();
//Create the path
string path = @"..\..\Products.xml";
//XmlReader Settings
XmlReaderSettings settings = new XmlReaderSettings();
settings.IgnoreComments = true;
settings.IgnoreWhitespace = true;
//XmlReader Objcet
XmlReader xmlIn = XmlReader.Create(path, settings);
//Read The First Root Node
if (xmlIn.ReadToDescendant("Product") == true)
{
do
{
Product product = new Product();
product.Code = xmlIn["Code"];
xmlIn.ReadStartElement("Product");
product.Description = xmlIn.ReadElementContentAsString();
product.Price = xmlIn.ReadElementContentAsDouble();
products.Add(product);
} while (xmlIn.ReadToNextSibling("Product"));
}
xmlIn.Close();
}
private void button2_Click(object sender, EventArgs e)
{
//Create the path
string path = @"..\..\Products.xml";
//Create the xmlDoc object
XDocument xmlDoc = XDocument.Load(path);
List products = (
from product in xmlDoc.Descendants("Product")
where product.Attribute("Code").Value == "A4CS"
select new Product
{
Code = product.Attribute("Code").Value,
Description = product.Element("Description").Value,
Price = Convert.ToDouble(product.Element("Price").Value),
}
).ToList();
foreach (Product product in products)
{
Console.WriteLine(product.Code);
Console.WriteLine(product.Description);
Console.WriteLine(product.Price);
}
}
}
}
--------------------------------------------------------------------------------------------------
I will show you here two pieces of code in C# that will let you parse the Products.XML into a List
The first one makes use of the System.XML namespace, while the second use System.XML.Linq one.
The Linq code is pretty amazing, it is so simple I will not even comment it. I managed also to include a "where" clause to filter the output.
An additional note has to be done for the XMLReader methods class for the first example
xmlIn.ReadToDescendant("Product") == true //This code move the cursor to the first "Product"
product.Code = xmlIn["Code"]; //Since we are already on the Product Element we can read its attribute with the indexer
xmlIn.ReadStartElement("Product"); // Checks that we are on Product Element and moves one raw ahead
product.Description = xmlIn.ReadElementContentAsString(); //Read the Content of the Element Description, and moves one raw ahead
product.Price = xmlIn.ReadElementContentAsDouble(); //Read the Content ofthe Element Price, and moves one raw ahead
xmlIn.ReadToNextSibling("Product") // Move the Cursor to the next product and return true if found
//Read The First Root Node
if (xmlIn.ReadToDescendant("Product") == true)
{
do
{
Product product = new Product();
product.Code = xmlIn["Code"];
xmlIn.ReadStartElement("Product");
product.Description = xmlIn.ReadElementContentAsString();
product.Price = xmlIn.ReadElementContentAsDouble();
products.Add(product);
} while (xmlIn.ReadToNextSibling("Product"));
}

"Products.XML"
--------------------------------------------------------------------------------------------------

--------------------------------------------------------------------------------------------------
"Product.cs"
--------------------------------------------------------------------------------------------------
using System;
using System.Collections.Generic;
using System.Linq;
using System.Text;
namespace WindowsFormsApplication1
{
class Product
{
public string Code { get; set; }
public string Description { get; set; }
public double Price { get; set; }
}
}
--------------------------------------------------------------------------------------------------
Form1.cs
--------------------------------------------------------------------------------------------------
using System;
using System.Collections.Generic;
using System.ComponentModel;
using System.Data;
using System.Drawing;
using System.Linq;
using System.Text;
using System.Windows.Forms;
using System.Xml;
using System.Xml.Linq;
namespace WindowsFormsApplication1
{
public partial class Form1 : Form
{
public Form1()
{
InitializeComponent();
}
private void button1_Click(object sender, EventArgs e)
{
//Create the list
List
//Create the path
string path = @"..\..\Products.xml";
//XmlReader Settings
XmlReaderSettings settings = new XmlReaderSettings();
settings.IgnoreComments = true;
settings.IgnoreWhitespace = true;
//XmlReader Objcet
XmlReader xmlIn = XmlReader.Create(path, settings);
//Read The First Root Node
if (xmlIn.ReadToDescendant("Product") == true)
{
do
{
Product product = new Product();
product.Code = xmlIn["Code"];
xmlIn.ReadStartElement("Product");
product.Description = xmlIn.ReadElementContentAsString();
product.Price = xmlIn.ReadElementContentAsDouble();
products.Add(product);
} while (xmlIn.ReadToNextSibling("Product"));
}
xmlIn.Close();
}
private void button2_Click(object sender, EventArgs e)
{
//Create the path
string path = @"..\..\Products.xml";
//Create the xmlDoc object
XDocument xmlDoc = XDocument.Load(path);
List
from product in xmlDoc.Descendants("Product")
where product.Attribute("Code").Value == "A4CS"
select new Product
{
Code = product.Attribute("Code").Value,
Description = product.Element("Description").Value,
Price = Convert.ToDouble(product.Element("Price").Value),
}
).ToList
foreach (Product product in products)
{
Console.WriteLine(product.Code);
Console.WriteLine(product.Description);
Console.WriteLine(product.Price);
}
}
}
}
--------------------------------------------------------------------------------------------------
Wednesday, May 19, 2010
Developing COM exposed classes in C#
Press here to download the template. CSharp_Com_Class.zip will be downloaded.
For some code example see this post
Here you can find a series of notes I took as reminders to develpod a COM Class in C#.
I will put it here just as a reference, I hope I will have more time in the future to show you a full example.
You can also find here a C# template you can use to start develop C# COM exposed class. You can delete all the comments out of it. I just add them there for my reference.
To install the template in your VS2008 you need first to find out where they are stored.
To do this, go to File, Export Template. After a few click you should find out where your exported templates
are stored
On my PC for example, they are store here
C:\Users\PP\Documents\Visual Studio 2008\My Exported Templates\WFA01.zip
Once you know this path, just copy the CSharp_Com_Class.zip in the following directory.
You must copy the .zip file. Do not unzip them.
C:\Users\PP\Documents\Visual Studio 2008\Templates\ItemTemplates\Visual C#.
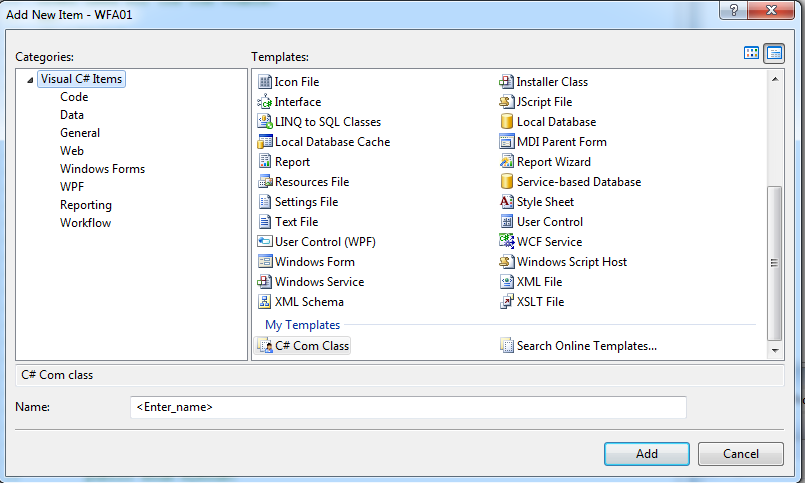
If things go well (and it took me sometime to figure out how to do it) you should have a new template in your
Add New Item, Visual C# Item

C# COM Rules:
To expose properties and methods to COM, you must declare them on the class
interface and mark them with a DispId attribute, and implement them in the class.
The order in which the members are declared in the interface is the
order used for the COM vtable.
ex:
[DispId(1)] void Init(string userid , string password);
[DispId(2)] bool ExecuteSelectCommand(string selCommand);
1)The Class must be public
2) Properties, methods and events that need to be exposed:
a) must be public
b) Properties and methods must be declared in the class interface. The class must implement this interface
c) Event must be declared on the Event Interface. The class should not implement this interface
3) Other Class member that are not declared in the class interface, are not visible to COM but are
visible to .NET classes
4) The class must have a default parametereless constructor. Always write is down even if is empty.
The class can have its constructors and methods overloaded.
5) COM does not support inheritance, only interface implementation
So you can't do Class Employees : List.
This will not be exposed to COM
6) C# can pass to COM zero based array using "ref" in the method signature.
Without ref, the method will not work!
ex: double[] Compute(ref double[] a, double b)
in VB 6.0 this will be like Dim a() as double
7) Variant can be passed as type "object"
8) Enum can be exposed. Remeber you need to generate a unique Guid using
C:\Programmi\Microsoft Visual Studio 9.0\Common7\Tools\guidgen.exe Registry format
[Guid("DE23AB62-269E-4418-BCBD-193BE024E21C"),
ComVisible(true)]
public enum MyEnum{
[DispId(1)] A = 0,
[DispId(1)] B = 1,
[DispId(1)] C = 2
}
Please not that "public enum MyEnum : long" will compile but will cause method that have MyEnum
in their signature not to work at all
9) Collections.
Collections can be implemented using encapsulation and delegation.
We can encapsulate a SortedList and delegate to it the implementation of
Count, Item, Remove, Add methods defined in the COM Interface.
Ex:
-----------------------------------------------------------------------------------------
[Guid("d345c3dc-825e-4be7-b129-2b3d00a7a2a7"),
ComVisible(true)]
public interface INetSortedList : IEnumerable
{
[DispId(-4)] new IEnumerator GetEnumerator(); //Iterator
[DispId(1)] void Add(object key, object value);
[DispId(2)] int Count{ get; }
[DispId(3)] void Remove(object key);
[DispId(0)] object this[object key] {get ; set; } //Default Property
}
//Events Interface
[Guid("4b1f6f84-c971-410a-8667-f5611f632b33"),
InterfaceType(ComInterfaceType.InterfaceIsIDispatch),
ComVisible(true)]
public interface INetSortedListEvents
{
}
//Class Implement the Class Interface
[Guid("1ca3e210-b5e3-458a-9175-002b7ff3274c"),
ClassInterface(ClassInterfaceType.None),
ComSourceInterfaces(typeof(INetSortedListEvents)),
ComVisible(true)]
public class NetSortedList : INetSortedList
{
private SortedList _sortedList;
public NetSortedList() { _sortedList = new SortedList(); }
public IEnumerator GetEnumerator() { return _sortedList.GetEnumerator(); }
public void Add(object key, object value) { _sortedList.Add(key, value);}
public int Count { get { return _sortedList.Count; } }
public void Remove(object key) { _sortedList.Remove(key); }
public object this[object key] {
get { return _sortedList[key]; }
set { _sortedList[key] = value; }
}
}
----------------------------------------------------------------------------------------------------------------
Please note that
a) the indexer "Employee this[int index] { get; set; }" will be seen in VB6.0 as
a default Item property so that you can do: list(1) or list.Item(1).
Its DispId must be set to = [DispId(0)] to work as default Property
b) System.Collections.IEnumerator GetEnumerator(); allows for the "for each" loop in VB 6.0. It
must have a [DispId(-4)]
You cannot use in the interface a Generic enumerator like "List.Enumerator" which is of type
System.Collections.Generic.List.Enumerator. You must use the non generic type
System.Collections.IEnumerator
The IEnumerator GetEnumerator() return in COM a IEnumVariant so it can be passed to NewEnum in
VB 6.0
Public Function NewEnun As IUnkonwn
NewEnum = obj.GetEnumerator()
End Function
In addition the "Current" propety of the Enumerator must return a type COM compatible,
otherwise the For Each Loop will work but you will not be able to access the Item of the collection. For
example for the code above the Current property will return a DictionaryEntry type that is not supported by
COM. A work around to this is to do the following
ICollection keys = _sortedList.Keys;
return (IEnumerator)keys.GetEnumerator();
This way the "Current" property will return the Keys in the collection and not the DictionaryEntry Object.
Another way around is to write your own Enumerator.
c) The collection is 0 based.
d) You could have the NetSortedList to implement System.Collections.Generic.ICollection
10) To make C# create and register the typelibrary go to
Project/Properties/Build tick Register for COM interop. (Reccomended Choice)
Otherwise you need to use REGASM. (asembly registration tool). The Assembly Registration tool reads
the metadata within an assembly and adds the necessary entries to the registry, which allows COM clients to create .NET Framework classes transparently. This utility is necessary when you need to expose to COM e .exe (winform application) .net assembly. You can create a type libray in this way. MyAssembly.dll can be also MyAssembly.exe
REGASMMyAssembly.dll /tlb:MyAssembly.tlb
To unregister just do
REGASM /u MyAssembly.dll /tlb:MyAssembly.tlb
As a note. When you add a COM dll to a project, C# calls REGASM for you, create a tlb file out of the
COM dll and put it in your project folder
For more details see the session DEPLOYMENT
11) It is important that you do not check the Project/Properties/Application/Assembly Information...
Make assembly COM-Visible. This option will set
[assembly: ConVisible(true)]
in the AssemblyInfo.cs file
Which will make all the Class in the Project COM visible. This in practice will make C# to generate
new Guids for each class on which we did not specify a Guid attribute each time we recompile, causing a registry bloat.
It is much better to set
[assembly: ConVisible(false)], and use ComVisible(true) at class level to specify which class should be
visible for COM interop
12) The assembly should be given a strong name.
Go to Properties/Signing. Tick Sign the assembly check box.
Then go to Choose a stroing name key file
Choose a name ex "MyLibrary_COM_Key"
This will create a MyLibray_COM_Key.snk file in the project folder.
The assembly is now signed with a strong name.
-----------------------------------------------------------------------------------------
-----------------------------------------------------------------------------------------
DEPLOYMENT
To deploy the Dll we need to register the .net assembly of a computer for COM interop.
To register it manually we have two ways
01) The dll assembly will reside on a specific folder decided at the moment of the assembly registration
You need to type the following commands:
regasm /u "FullPath\MyLibray.dll" /tlb
regasm /codebase "FullPath\MyLibray.dll" /tlb
ragasm is located in c:\WINDOWS\Microsoft.NET\Framework\v2.0.50727\regasm.exe
The first line unregister MyLibrary.dll and its type library
The second line register MyLibrary.dll create the type libary and register them in the COM registry
the /codebase option saves in the regestry the path of the dll
This is exactly what the option "Register for COM interop" Does
If we do not put the /codebase option, VB6.0 will complain that it cannot find the dll file
02) The dll assembly will reside in the GAC c:\WINDOWS\assembly. The assembly MUST be strongly named if you want to install it in the GAC.
You need to type the following commands
regasm "FullPath\MyLibray.dll" /tlb
gacutil /if "FullPath\MyLibray.dll"
The first line register the assembly for COM interop. Please note that we must leave out /codebase, because
we will put the dll in the GAC.
The second line, registers MyLibray in the GAC.
This mean that all the application will look at the GAC when we run the assembly
To unregister we do
regasm /u "FullPath\MyLibrary.dll" /tlb
gacutil /uf MyLibrary
To Remove from the GAC a specif version
gacutil /uf MyLibrary , Version=1.1.0.0
Please note the we do not use neither the FullPath nor the .dll/.exe to remove an assembly from the GAC
in addition each .NET Framework has its own gacutil.exe. The one for .NET 3.5 can be found here
"C:\Program Files\Microsoft SDKs\Windows\v6.0A\bin\gacutil.exe"
Installing the assembly in the GAC ensures that multiple versions of the component can exist side-by-side.
An additional hard requirement for COM is that you change the GUIDs of the public interfaces and classes
when you change their definitions. Failing to do so will wipe out the registry info for the old component
and will make old client programs that have not been recompiled with the new component crash and burn.
A problem better known as DLL Hëll.
if We need to change the interace of our COM component we need to
1) Change the version number of the assembly. (Do not change the strong key name of file)
2) Change the GUIDs for both the Class and interface of the class that has been changed
Changing them all could be better to avoid trouble when they depend on each other.
For some code example see this post
Here you can find a series of notes I took as reminders to develpod a COM Class in C#.
I will put it here just as a reference, I hope I will have more time in the future to show you a full example.
You can also find here a C# template you can use to start develop C# COM exposed class. You can delete all the comments out of it. I just add them there for my reference.
To install the template in your VS2008 you need first to find out where they are stored.
To do this, go to File, Export Template. After a few click you should find out where your exported templates
are stored
On my PC for example, they are store here
C:\Users\PP\Documents\Visual Studio 2008\My Exported Templates\WFA01.zip
Once you know this path, just copy the CSharp_Com_Class.zip in the following directory.
You must copy the .zip file. Do not unzip them.
C:\Users\PP\Documents\Visual Studio 2008\Templates\ItemTemplates\Visual C#.
If things go well (and it took me sometime to figure out how to do it) you should have a new template in your
Add New Item, Visual C# Item
C# COM Rules:
To expose properties and methods to COM, you must declare them on the class
interface and mark them with a DispId attribute, and implement them in the class.
The order in which the members are declared in the interface is the
order used for the COM vtable.
ex:
[DispId(1)] void Init(string userid , string password);
[DispId(2)] bool ExecuteSelectCommand(string selCommand);
1)The Class must be public
2) Properties, methods and events that need to be exposed:
a) must be public
b) Properties and methods must be declared in the class interface. The class must implement this interface
c) Event must be declared on the Event Interface. The class should not implement this interface
3) Other Class member that are not declared in the class interface, are not visible to COM but are
visible to .NET classes
4) The class must have a default parametereless constructor. Always write is down even if is empty.
The class can have its constructors and methods overloaded.
5) COM does not support inheritance, only interface implementation
So you can't do Class Employees : List
This will not be exposed to COM
6) C# can pass to COM zero based array using "ref" in the method signature.
Without ref, the method will not work!
ex: double[] Compute(ref double[] a, double b)
in VB 6.0 this will be like Dim a() as double
7) Variant can be passed as type "object"
8) Enum can be exposed. Remeber you need to generate a unique Guid using
C:\Programmi\Microsoft Visual Studio 9.0\Common7\Tools\guidgen.exe Registry format
[Guid("DE23AB62-269E-4418-BCBD-193BE024E21C"),
ComVisible(true)]
public enum MyEnum{
[DispId(1)] A = 0,
[DispId(1)] B = 1,
[DispId(1)] C = 2
Please not that "public enum MyEnum : long" will compile but will cause method that have MyEnum
in their signature not to work at all
9) Collections.
Collections can be implemented using encapsulation and delegation.
We can encapsulate a SortedList and delegate to it the implementation of
Count, Item, Remove, Add methods defined in the COM Interface.
Ex:
-----------------------------------------------------------------------------------------
[Guid("d345c3dc-825e-4be7-b129-2b3d00a7a2a7"),
ComVisible(true)]
public interface INetSortedList : IEnumerable
{
[DispId(-4)] new IEnumerator GetEnumerator(); //Iterator
[DispId(1)] void Add(object key, object value);
[DispId(2)] int Count{ get; }
[DispId(3)] void Remove(object key);
[DispId(0)] object this[object key] {get ; set; } //Default Property
//Events Interface
[Guid("4b1f6f84-c971-410a-8667-f5611f632b33"),
InterfaceType(ComInterfaceType.InterfaceIsIDispatch),
ComVisible(true)]
public interface INetSortedListEvents
{
}
//Class Implement the Class Interface
[Guid("1ca3e210-b5e3-458a-9175-002b7ff3274c"),
ClassInterface(ClassInterfaceType.None),
ComSourceInterfaces(typeof(INetSortedListEvents)),
ComVisible(true)]
public class NetSortedList : INetSortedList
{
private SortedList _sortedList;
public NetSortedList() { _sortedList = new SortedList(); }
public IEnumerator GetEnumerator() { return _sortedList.GetEnumerator(); }
public void Add(object key, object value) { _sortedList.Add(key, value);}
public int Count { get { return _sortedList.Count; } }
public void Remove(object key) { _sortedList.Remove(key); }
public object this[object key] {
get { return _sortedList[key]; }
set { _sortedList[key] = value; }
}
}
----------------------------------------------------------------------------------------------------------------
Please note that
a default Item property so that you can do: list(1) or list.Item(1).
Its DispId must be set to = [DispId(0)] to work as default Property
b) System.Collections.IEnumerator GetEnumerator(); allows for the "for each" loop in VB 6.0. It
You cannot use in the interface a Generic enumerator like "List
The IEnumerator GetEnumerator() return in COM a IEnumVariant so it can be passed to NewEnum in
NewEnum = obj.GetEnumerator()
End Function
otherwise the For Each Loop will work but you will not be able to access the Item of the collection. For
ICollection keys = _sortedList.Keys;
return (IEnumerator)keys.GetEnumerator();
This way the "Current" property will return the Keys in the collection and not the DictionaryEntry Object.
Another way around is to write your own Enumerator.
c) The collection is 0 based.
d) You could have the NetSortedList to implement System.Collections.Generic.ICollection
Project/Properties/Build tick Register for COM interop. (Reccomended Choice)
Otherwise you need to use REGASM. (asembly registration tool). The Assembly Registration tool reads
the metadata within an assembly and adds the necessary entries to the registry, which allows COM clients to create .NET Framework classes transparently. This utility is necessary when you need to expose to COM e .exe (winform application) .net assembly. You can create a type libray in this way. MyAssembly.dll can be also MyAssembly.exe
REGASM
To unregister just do
REGASM /u MyAssembly.dll /tlb:MyAssembly.tlb
As a note. When you add a COM dll to a project, C# calls REGASM for you, create a tlb file out of the
COM dll and put it in your project folder
For more details see the session DEPLOYMENT
Make assembly COM-Visible. This option will set
[assembly: ConVisible(true)]
in the AssemblyInfo.cs file
Which will make all the Class in the Project COM visible. This in practice will make C# to generate
new Guids for each class on which we did not specify a Guid attribute each time we recompile, causing a registry bloat.
It is much better to set
[assembly: ConVisible(false)], and use ComVisible(true) at class level to specify which class should be
visible for COM interop
12) The assembly should be given a strong name.
Go to Properties/Signing. Tick Sign the assembly check box.
Then go to Choose a stroing name key file
Choose a name ex "MyLibrary_COM_Key"
This will create a MyLibray_COM_Key.snk file in the project folder.
The assembly is now signed with a strong name.
-----------------------------------------------------------------------------------------
-----------------------------------------------------------------------------------------
DEPLOYMENT
To deploy the Dll we need to register the .net assembly of a computer for COM interop.
To register it manually we have two ways
01) The dll assembly will reside on a specific folder decided at the moment of the assembly registration
You need to type the following commands:
regasm /u "FullPath\MyLibray.dll" /tlb
regasm /codebase "FullPath\MyLibray.dll" /tlb
ragasm is located in c:\WINDOWS\Microsoft.NET\Framework\v2.0.50727\regasm.exe
The first line unregister MyLibrary.dll and its type library
The second line register MyLibrary.dll create the type libary and register them in the COM registry
the /codebase option saves in the regestry the path of the dll
This is exactly what the option "Register for COM interop" Does
If we do not put the /codebase option, VB6.0 will complain that it cannot find the dll file
02) The dll assembly will reside in the GAC c:\WINDOWS\assembly. The assembly MUST be strongly named if you want to install it in the GAC.
You need to type the following commands
regasm "FullPath\MyLibray.dll" /tlb
gacutil /if "FullPath\MyLibray.dll"
The first line register the assembly for COM interop. Please note that we must leave out /codebase, because
we will put the dll in the GAC.
The second line, registers MyLibray in the GAC.
This mean that all the application will look at the GAC when we run the assembly
To unregister we do
regasm /u "FullPath\MyLibrary.dll" /tlb
gacutil /uf MyLibrary
To Remove from the GAC a specif version
gacutil /uf MyLibrary , Version=1.1.0.0
Please note the we do not use neither the FullPath nor the .dll/.exe to remove an assembly from the GAC
in addition each .NET Framework has its own gacutil.exe. The one for .NET 3.5 can be found here
"C:\Program Files\Microsoft SDKs\Windows\v6.0A\bin\gacutil.exe"
Installing the assembly in the GAC ensures that multiple versions of the component can exist side-by-side.
An additional hard requirement for COM is that you change the GUIDs of the public interfaces and classes
when you change their definitions. Failing to do so will wipe out the registry info for the old component
and will make old client programs that have not been recompiled with the new component crash and burn.
A problem better known as DLL Hëll.
if We need to change the interace of our COM component we need to
1) Change the version number of the assembly. (Do not change the strong key name of file)
2) Change the GUIDs for both the Class and interface of the class that has been changed
Changing them all could be better to avoid trouble when they depend on each other.
UDFs for Excel in VSTO
VSTO does not support yet the introduction of UDFs, which is a kind of crazy!
However there are few work around.
UDFs as Automation Add-in
This technique is good if you want to make the function available for every workbook in the Excel Application. It is based on the development of an "Excel Automation Add-in".
This consist of developing a kind of C# COM exposed class.
It was a good idea that the author included in the example the GUID identifiers to avoid registry bloating, however I don't know why he did not defined an Internface and let the class implement it, which is the standard way to develop COM exposed class in .NET
http://blogs.msdn.com/eric_carter/archive/2004/12/01/273127.aspx
UDFs in Code behind files
This technique is good when you want to define workbook level UDFs. It is based on a COM exposed class and some VBA wrapper that you need to write at workbook level. The only problem I had was to the the Exel.Application.Run command work fine. My mistake was due to the fact that I was adding the VBA code the the Excel file that shows up after building and running the program. I did not realized that each time I run, the original .xls file used by the solution was overwriting the one I was editing.
http://blogs.msdn.com/pstubbs/archive/2004/12/31/344964.aspx
Consideration
Given the fact that VSTO does not suggest to save aa .XLA, a .XLS files based on VSTO solution, it is still quite hard to deploy an add-in that can use and excel file as data storage.
For example I developed some years ago an Excel Add-in .XLA to bootstrap the Interest Rate Swap Curve in US and Euro area, and I was using a spreadsheet in the .xls file to store data. The add-in makes available to every workbook a set of functions to compute some fixed income analytics : PV, duration, factor analysis...
Of course if this is the idea, the code-behind pattern VSTO solution is ruled out (it cannot make available function to everywork book that runs in an Excel application).
We are left with the Automation add-in solution, which is basically a COM Exposed Class. However, the automation add-in does not have any worksheet to store the data. To be honest one could also develop a COM based add-in (which I do not cover here), but I think it would not sort the problem out.
If anybody has any idea on how to develop .xla kind of add-in, ie a VSTO solution that allows to
1) make UDFs available at application level
2) use an Excel file to store some data
as an .xla solution does, please let me know.
However there are few work around.
UDFs as Automation Add-in
This technique is good if you want to make the function available for every workbook in the Excel Application. It is based on the development of an "Excel Automation Add-in".
This consist of developing a kind of C# COM exposed class.
It was a good idea that the author included in the example the GUID identifiers to avoid registry bloating, however I don't know why he did not defined an Internface and let the class implement it, which is the standard way to develop COM exposed class in .NET
http://blogs.msdn.com/eric_carter/archive/2004/12/01/273127.aspx
UDFs in Code behind files
This technique is good when you want to define workbook level UDFs. It is based on a COM exposed class and some VBA wrapper that you need to write at workbook level. The only problem I had was to the the Exel.Application.Run command work fine. My mistake was due to the fact that I was adding the VBA code the the Excel file that shows up after building and running the program. I did not realized that each time I run, the original .xls file used by the solution was overwriting the one I was editing.
http://blogs.msdn.com/pstubbs/archive/2004/12/31/344964.aspx
Consideration
Given the fact that VSTO does not suggest to save aa .XLA, a .XLS files based on VSTO solution, it is still quite hard to deploy an add-in that can use and excel file as data storage.
For example I developed some years ago an Excel Add-in .XLA to bootstrap the Interest Rate Swap Curve in US and Euro area, and I was using a spreadsheet in the .xls file to store data. The add-in makes available to every workbook a set of functions to compute some fixed income analytics : PV, duration, factor analysis...
Of course if this is the idea, the code-behind pattern VSTO solution is ruled out (it cannot make available function to everywork book that runs in an Excel application).
We are left with the Automation add-in solution, which is basically a COM Exposed Class. However, the automation add-in does not have any worksheet to store the data. To be honest one could also develop a COM based add-in (which I do not cover here), but I think it would not sort the problem out.
If anybody has any idea on how to develop .xla kind of add-in, ie a VSTO solution that allows to
1) make UDFs available at application level
2) use an Excel file to store some data
as an .xla solution does, please let me know.
Windows 7 run command...

VSTO "Excel Disigner Could Not Be Activated" error
After Installing VSTO on my PC, and trying our my first "Code Behind" project, I could not have access to the Excel designer. No controls were displayed in the Control toolbox and I could not any button or any type of control on the excel worksheet I was working on
The error message was a pretty scary one
"Excel Designer Could Not Be Activated"
After a bit of diggin on google I found this Post on the msdn forum, which helped me out sort the problem.
Among the different suggestions the one that worked for me was to reinstall the VSTO run time.
If you are developing solution for Excel 2003 and VS2008 this is the one you need
Microsoft Visual Studio 2005 Tools for Office Second Edition Runtime (VSTO 2005 SE) (x86)
or the latest version (up to date of publishing)
Microsoft Visual Studio 2005 Tools for Office Second Edition Runtime (VSTO 2005 SE) (x86)(build 8.0.50727.940)
If you are developing solution for Excel 2007 and VS2008 this is the other link
Microsoft Visual Studio Tools for the Microsoft Office system (version 3.0 Runtime) SP1 (x86)
The error message was a pretty scary one
"Excel Designer Could Not Be Activated"
After a bit of diggin on google I found this Post on the msdn forum, which helped me out sort the problem.
Among the different suggestions the one that worked for me was to reinstall the VSTO run time.
If you are developing solution for Excel 2003 and VS2008 this is the one you need
Microsoft Visual Studio 2005 Tools for Office Second Edition Runtime (VSTO 2005 SE) (x86)
or the latest version (up to date of publishing)
Microsoft Visual Studio 2005 Tools for Office Second Edition Runtime (VSTO 2005 SE) (x86)(build 8.0.50727.940)
If you are developing solution for Excel 2007 and VS2008 this is the other link
Microsoft Visual Studio Tools for the Microsoft Office system (version 3.0 Runtime) SP1 (x86)
Office 2003, PIA Installation guidelines for .NET platform
In case you have problem getting the Primary Interop Assembly (PIA) working fine with your .NET Visual Studio platform, just check this link.
Installing the PIA for Office 2003
For example I kept having a "tlbimp.exe" generated assembly (not the PIA) when adding a COM Reference to Microsoft.Office.Interop.Excel, from the "Add Reference", COM tab window.

This means the the .dll path of this reference was pointing to a local dll (local to the project), rather than the one registered in the GAC.
I sorted the problem just changing the "Copy Local" property to false, removing the reference and adding it again.
However, you could also have had some problem with the registration of the PIA in the GAC (Global Assembly Cache). The above link help you sort this kind of problems.
Installing the PIA for Office 2003
For example I kept having a "tlbimp.exe" generated assembly (not the PIA) when adding a COM Reference to Microsoft.Office.Interop.Excel, from the "Add Reference", COM tab window.

This means the the .dll path of this reference was pointing to a local dll (local to the project), rather than the one registered in the GAC.
I sorted the problem just changing the "Copy Local" property to false, removing the reference and adding it again.
However, you could also have had some problem with the registration of the PIA in the GAC (Global Assembly Cache). The above link help you sort this kind of problems.
Tuesday, April 27, 2010
Microsoft.Jet.OLEDB.4.0 provider driver on a 64bit System
Today, I tried to set a connection to an Access 2003 database using ADO.NET whithin c# 2008 express platform.
After setting the option
Debug -- Exception - Common Language Run Time Excepton - Thrown
This error was thrown
"The Microsoft.Jet.OLEDB.4.0 provider is not registered on the local machine"
After a bit of search, I have realized that the problem was the 32bit OLEDB COM driver that needs to be used in a 32bit process. C# express, by default, on a W64bit system, will compile the project for an x64bit process. To compile for a x86 processor you need:
In visual studio 2008
Tools --> Options --> Projects and Solutions-->General Check "Show advanced build configurations"
Right click on the Project in the solution explorer folder - Build - Platform - x86 (the default is Any Cpu)
However c# express does not have this option. You will need to carefully modify the project file using a text or XML editor.
1. Close the project and/or solution
2. Select Open File from the File menu
3. Navigate to the project directory, and highlight the project file
4. Press the Open button, the project file should open in the XML editor
5. Locate the first section and add the following line:
x86
6. Save the project file
7. Reopen the project and/or solution using Open Project/Solution from the File menu
8. Continue with development, debugging, and testing
Here you can find the original post by John Wein which I report here in full for reference
References to 32-bit COM components may not work in VB and C# Applications running on 64-bit platforms
Most existing COM components are only available for 32-bit platforms and will not run in a 64-bit process on a 64-bit platform (although they will run correctly in a 32-bit process on a 64-bit platform). VB and C# applications that reference these 32bit COM components will not run by default on a 64-bit platform because by default the application will launch as a 64-bit process.
The problem appears when a project with one or more COM references is:
1. Migrated to Visual Studio 2005 and executed on 64-bit platforms
-or-
2. Created using Visual Studio 2005 on 64-bit platforms.
In Visual Studio 2005, the VB and C# compilers use the platform target property to determine if the.exe or .dll should run in 32-bit or 64-bit CPU architecture mode. The default setting for this property in Visual Studio 2005 is set to 'AnyCPU', which indicates that the application can run in either 32-bit or 64-bit mode, depending on the host platform. In this situation you may see a message such as "Cannot instantiate class..." when you debug or run these applications.
To resolve this issue
Set the platform target property to 'X86' for your VB or C# projects that have references to COM components.
For C# Projects:
1. Right click the project in the solution explorer and open 'properties'
2. Choose the Build tab
3. Set the Platform Target property to 'X86'
For VB Projects:
1. Right click the project in the solution explorer and open 'properties'
2. Choose the Compile tab
3. Press the Advanced Compile Options... button
4. Set the Target CPU property to 'X86'
Express Editions:
The VB and C# Express products do not expose the Target property inside the development environment. You will need to carefully modify the project file using a text or XML editor.
1. Close the project and/or solution
2. Select Open File from the File menu
3. Navigate to the project directory, and highlight the project file
4. Press the Open button, the project file should open in the XML editor
5. Locate the first section and add the following line:
x86
1. Save the project file
2. Reopen the project and/or solution using Open Project/Solution from the File menu
3. Continue with development, debugging, and testing
Alternatively, if the application is targeted to 64-bit platforms, you can ensure that the COM controls added to the application have 64-bit equivalents on the development and deployment computers.
JohnWein added the following:
Using the above method targets the x86 platform, but it doesn't show the "Configuration:" and "Platform: " boxes on the Properties tabs. To get this feature, I made a template of one of the projects that shows these boxes. Now I can target a platform and know what platform I have targeted.
After setting the option
Debug -- Exception - Common Language Run Time Excepton - Thrown
This error was thrown
"The Microsoft.Jet.OLEDB.4.0 provider is not registered on the local machine"
After a bit of search, I have realized that the problem was the 32bit OLEDB COM driver that needs to be used in a 32bit process. C# express, by default, on a W64bit system, will compile the project for an x64bit process. To compile for a x86 processor you need:
In visual studio 2008
Tools --> Options --> Projects and Solutions-->General Check "Show advanced build configurations"
Right click on the Project in the solution explorer folder - Build - Platform - x86 (the default is Any Cpu)
However c# express does not have this option. You will need to carefully modify the project file using a text or XML editor.
1. Close the project and/or solution
2. Select Open File from the File menu
3. Navigate to the project directory, and highlight the project file
4. Press the Open button, the project file should open in the XML editor
5. Locate the first
6. Save the project file
7. Reopen the project and/or solution using Open Project/Solution from the File menu
8. Continue with development, debugging, and testing
Here you can find the original post by John Wein which I report here in full for reference
References to 32-bit COM components may not work in VB and C# Applications running on 64-bit platforms
Most existing COM components are only available for 32-bit platforms and will not run in a 64-bit process on a 64-bit platform (although they will run correctly in a 32-bit process on a 64-bit platform). VB and C# applications that reference these 32bit COM components will not run by default on a 64-bit platform because by default the application will launch as a 64-bit process.
The problem appears when a project with one or more COM references is:
1. Migrated to Visual Studio 2005 and executed on 64-bit platforms
-or-
2. Created using Visual Studio 2005 on 64-bit platforms.
In Visual Studio 2005, the VB and C# compilers use the platform target property to determine if the.exe or .dll should run in 32-bit or 64-bit CPU architecture mode. The default setting for this property in Visual Studio 2005 is set to 'AnyCPU', which indicates that the application can run in either 32-bit or 64-bit mode, depending on the host platform. In this situation you may see a message such as "Cannot instantiate class..." when you debug or run these applications.
To resolve this issue
Set the platform target property to 'X86' for your VB or C# projects that have references to COM components.
For C# Projects:
1. Right click the project in the solution explorer and open 'properties'
2. Choose the Build tab
3. Set the Platform Target property to 'X86'
For VB Projects:
1. Right click the project in the solution explorer and open 'properties'
2. Choose the Compile tab
3. Press the Advanced Compile Options... button
4. Set the Target CPU property to 'X86'
Express Editions:
The VB and C# Express products do not expose the Target property inside the development environment. You will need to carefully modify the project file using a text or XML editor.
1. Close the project and/or solution
2. Select Open File from the File menu
3. Navigate to the project directory, and highlight the project file
4. Press the Open button, the project file should open in the XML editor
5. Locate the first
1. Save the project file
2. Reopen the project and/or solution using Open Project/Solution from the File menu
3. Continue with development, debugging, and testing
Alternatively, if the application is targeted to 64-bit platforms, you can ensure that the COM controls added to the application have 64-bit equivalents on the development and deployment computers.
JohnWein added the following:
Using the above method targets the x86 platform, but it doesn't show the "Configuration:" and "Platform: " boxes on the Properties tabs. To get this feature, I made a template of one of the projects that shows these boxes. Now I can target a platform and know what platform I have targeted.
Wednesday, April 21, 2010
Excel Tip of the Day: How to work with Lists
A List is a set of ordered labels. For example the days of the week is an example of list
Monday, Tuesday, Wednesday, Thursday, Friday, Saturday, Sunday
Excel has some built-in list:

Let's suppose that you need to list the day of the week in your spreadsheet. Since this is a built-in list, a quick way to achieve this is do to as follow
Just type the fist day in column A as in the figure

Then grab down the handle in the bottom-right corner

This is what you will get. Pretty straightforward isn't it?
The most interesting part is that Excel gives you the options to create custom Lists.
Let see how to do it
In Office 2007 you need to

Once we have build the list, we can use it as if it was a built-in one.
Type Blue in A3, grab down the fill handle and you will have the custom colour list filled in your worksheet

As a side note, if the list is lengthy, you can also import the list from cells.
Monday, Tuesday, Wednesday, Thursday, Friday, Saturday, Sunday
Excel has some built-in list:

Let's suppose that you need to list the day of the week in your spreadsheet. Since this is a built-in list, a quick way to achieve this is do to as follow
Just type the fist day in column A as in the figure

Then grab down the handle in the bottom-right corner

This is what you will get. Pretty straightforward isn't it?
The most interesting part is that Excel gives you the options to create custom Lists.
Let see how to do it
In Office 2007 you need to
- Click the Microsoft Office Button, and then Excel Options.
- Click Popular, and then under Top options for working with Excel, click Edit Custom Lists.
- In the Custom lists box, click NEW LIST, and then type the entries in the List entries box, starting with the first entry.
- Then click OK twice

Once we have build the list, we can use it as if it was a built-in one.
Type Blue in A3, grab down the fill handle and you will have the custom colour list filled in your worksheet

As a side note, if the list is lengthy, you can also import the list from cells.
Sunday, April 18, 2010
Excel Tip of the Day: My favourite shortcuts
In this post I will publish my favourite shortcuts. Shortcuts are overlooked by most users, but I can guarantee you that if you start to learn them you will be as much as 30% faster while using Excel. You will not need to use the mouse anymore, which is very time saving.
Let's get started
These are the most basic ones
Ctrl + C Copy
Ctrl + V Paste
Ctrl + X Cut
Ctrl + Z Undo
Ctrl + R Redo
Now let's see some others for copying and pasting
Alt + E + S + V Copy Values
Alt + E + S + F Copy Formulas
Alt + E + S + M Multiply
Alt + E + S + D Add
Alt + E + S + E Transpose
Quick Cell Formatting
Alt + O + C Autofit Column Width
Ctrl + Shift + ! Change Format: two decimal place, thousands separator
Ctrl + Shift + ~ Change Format: General format
Selection ShortCuts
Alt + ; Display only visible cells
Shift + Space Bar Select Rows
Ctrl + Space Bar Select Columns
Ctrl + A Select Current Region
Ctrl + A + A Select Entire Worksheet
Ctrl + / Select current array formula
While Editing a Formula
Ctrl + A Display the formula input box
Ctrl + Shift + A Print in the formula bar the formula with arguments (not so useful in Excel 2010)
Filtering
Alt + D + F Dispaly Filter
Grouping
Shift + Alt + Righ Arrow Group
Shift + Alt + Left Arrow Ungroup
Please feel free to add your most used shortcuts in the comments.
Let's get started
These are the most basic ones
Ctrl + C Copy
Ctrl + V Paste
Ctrl + X Cut
Ctrl + Z Undo
Ctrl + R Redo
Now let's see some others for copying and pasting
Alt + E + S + V Copy Values
Alt + E + S + F Copy Formulas
Alt + E + S + M Multiply
Alt + E + S + D Add
Alt + E + S + E Transpose
Quick Cell Formatting
Alt + O + C Autofit Column Width
Ctrl + Shift + ! Change Format: two decimal place, thousands separator
Ctrl + Shift + ~ Change Format: General format
Selection ShortCuts
Alt + ; Display only visible cells
Shift + Space Bar Select Rows
Ctrl + Space Bar Select Columns
Ctrl + A Select Current Region
Ctrl + A + A Select Entire Worksheet
Ctrl + / Select current array formula
While Editing a Formula
Ctrl + A Display the formula input box
Ctrl + Shift + A Print in the formula bar the formula with arguments (not so useful in Excel 2010)
Filtering
Alt + D + F Dispaly Filter
Grouping
Shift + Alt + Righ Arrow Group
Shift + Alt + Left Arrow Ungroup
Please feel free to add your most used shortcuts in the comments.
Tuesday, April 13, 2010
Back up software: Allway sync, Syncback pro, Paragon Hard Disk Manager Suite (Part II)
In this post we will have a look at Allway Sync.
This image shows the main screen

Once loaded up in memory, the software takes up 45Mb of RAM.
To set up a job is fairly straighforward
1) Go to Job - Add a New Job. This will add the "New Job 1" tab
2) Browse to the left and right sync folder
3) Left Click on Analyze
4) Right Click on Synchronize
That's pretty much it.
Clicking on the "Change" button we can define the type of back up we want.
Two-way sync
As an example here we have created a two-way folder sync with propagation of deletions and modifications.

Back-up
This job here instead is similar to a Back up, Files are propageted to the right, with their changes, but no deletion is done

Mirroring
This job set a Mirroring, both deletions and modification are propageted

The sofware has also some versioning capabilties, but they are not great.
To sync 111,440 files it took 2min 02sec and 300Mb of memory, 45Mb for the sofware, 255 for the sync job. Speed wise is a good result, however it takes up a lot of memory too. As an example for 1Mln files we would need 2.33Gb of memory (if we can extrapolate the test result linearly). As you will see in one of my next post Syncback is much better to keep the RAM used low.
The main consequence of this inefficiecy is that it can ran into problem synching several hundreds of thousands files
Another major drawback is that you cannot sync two drives according to their label or serial number, which is a pain when you are using external drives whose letter is assigned by windows each time you plug the drive in a usb port. If windows reassigns a drive letter you need to change the left/right drive path in the Job tab.
Allway sync can also to run the jobs simultaneously, however this creates an ovearheard on the machine and make this feature pretty much useless. I gave it a try once, but had to stop the process.
For these easons I decided that I needed a new sync software and I started to search the web.This is how I end up buying Syncback Pro. As you will see, it sorts out all these drawbacks and gives much more flexibility to the end user.
<< previous
This image shows the main screen

Once loaded up in memory, the software takes up 45Mb of RAM.
To set up a job is fairly straighforward
1) Go to Job - Add a New Job. This will add the "New Job 1" tab
2) Browse to the left and right sync folder
3) Left Click on Analyze
4) Right Click on Synchronize
That's pretty much it.
Clicking on the "Change" button we can define the type of back up we want.
Two-way sync
As an example here we have created a two-way folder sync with propagation of deletions and modifications.

Back-up
This job here instead is similar to a Back up, Files are propageted to the right, with their changes, but no deletion is done

Mirroring
This job set a Mirroring, both deletions and modification are propageted

The sofware has also some versioning capabilties, but they are not great.
To sync 111,440 files it took 2min 02sec and 300Mb of memory, 45Mb for the sofware, 255 for the sync job. Speed wise is a good result, however it takes up a lot of memory too. As an example for 1Mln files we would need 2.33Gb of memory (if we can extrapolate the test result linearly). As you will see in one of my next post Syncback is much better to keep the RAM used low.
The main consequence of this inefficiecy is that it can ran into problem synching several hundreds of thousands files
Another major drawback is that you cannot sync two drives according to their label or serial number, which is a pain when you are using external drives whose letter is assigned by windows each time you plug the drive in a usb port. If windows reassigns a drive letter you need to change the left/right drive path in the Job tab.
Allway sync can also to run the jobs simultaneously, however this creates an ovearheard on the machine and make this feature pretty much useless. I gave it a try once, but had to stop the process.
For these easons I decided that I needed a new sync software and I started to search the web.This is how I end up buying Syncback Pro. As you will see, it sorts out all these drawbacks and gives much more flexibility to the end user.
<< previous
Subscribe to:
Posts (Atom)